Tuesday, December 29, 2009

How To: Recycle the clear plastic left-over from toy boxes (or any really)

Remeber these picture frames I made?


Well I finally found a use for them..


This plastic is from one of my DS's toy packaging.. I just ripped it out of the box
(there are some scratches, but you can't tell with the finished product)


Then I cut the plastic 3 3/4" by 3 3/4"


 then I rounded the points off with scissors


I cut a star and a flower from the George and Basic Shapes cartridge, using vinyl, then placed it on my plastic and smoothed out


Place the plastic into the frame (vinyl side out, it looks better), and then I bent the prongs to hold a picture backwards so that they wouldn't show through


Then hot glue the inside of the frame where the plastic will sit
(I tried the Glue pen first, but it soaked through the wood, lol)
and place the plastic in the frame


And Ta Da!  An easy and inexpensive piece of home decor


And the other one


An update with lots of pictures

Okay, so I finally got the pictures off of my camera. 


Isn't this adorable?  My mom made it for me. (Please excuse my apparently dirty stove, didn't realize it looked like that till I went through the pictures)


Just for show, here is our tree (equipped with the salt dough ornaments we made)


This is one of the things I got my DH for Christmas.  I made him wait to open it because he couldn't figure out what it was while it wrapped.  The picture itself had came in a tube, and he had seen that, so when when it was wrapped in the frame, it threw him for a loop.


Here it is hanging.  This was taken in June of this year, on our trip to California to see my DH family, I had never been to the Grand Canyon, so he took me.


Guess what I got for Christmas?  Yay a Cricut!


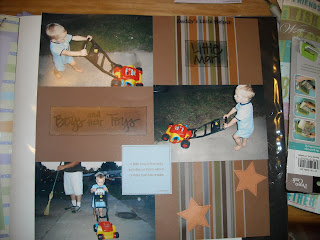
This is one of the scrapbook pages I made using the cricut
(that thing on my sons head is shorts from Build-A-Bear, I was at work, and these are the pictures I came home to, my DH thought it was hilarious)


Here is the first page I made with my cricut, the letters are from Opposites Attract.


I made this one awhile ago, just thought it was cute.

I am working on some more projects, so stay in touch!


Monday, December 28, 2009

New Signature

Like it?  Thank you to Becca at Blue Cricket Design for showing how to do this!

Been lazy, er busy

I got a Cricut for Christmas, so I have been working on some scrapbook pages, as well as an invitation template for my sons 6th Birthday party. I will be posting those soon.


Since it's that time of the year again to make resolutions for the New Year, here are mine:

  • Take lots of pictures and make a scrapbook for 2010 (the scrapbook I've been working on is just a collection of the past 8 years since I just scrap as I come across pictures)
  • Post regularly on this blog
  • Try out lots of new ideas
  • Buy a house (and have my own craft room)
  • Start up an Etsy shop (so I can quit my job and become a full time crafter [lol])
  • Get into shape (of course) my DH got me the Wii fit Plus
That's what I got so far, what are some of your New Years Resolutions?

Thursday, November 26, 2009

Tuesday, November 17, 2009

Finished small wall shelf

I've had this little shelf forever, and could not figure out what I wanted to do with it


My mom bought some black paint, and I had scraps of scrapbook paper left over from the frames I had done


So I painted it, and Mod Podge'd the scrap paper on the top


Then I went over the whole thing with Gloss Mod Podge and here is the final result:


Cute huh?  Now I just need to hang it!

Ribbon Christmas Tree

My mom found these cute christmas trees in the Micheal's Holiday Decor Guide

All we used was a styrofoam cone, ribbon, and straight pens


I thought they turned out adorable!


My mom alternated ribbons and colors throughout


And I alternated ribbon colors by rows.
My son made the stars for both.
You can find this tutorial here.


Salt Dough Ornaments

Found this great recipe and project at "That Artist Woman"


We decided to make christmas ornaments out of ours


He got the dough pressed out


Then we painted them


Then I wrote his name and the year on the back and sealed them with Mod Podge and placed a ribbon through the holes.  This was a fun project and he enjoyed it so much.

Thursday, November 12, 2009

She got her wreath done!

Here is my moms book page wreath:


She used gold glitter..


Wednesday, November 11, 2009

Mod Podge Picture Frames

I have been wanting to make somethingwith Mod Podge for a long time now, and I finally bought some (with the help of my Michaels 50% off coupon) . I though I would start off with something easy, so picture frames it is.  I also used this tutorial as a guide.


I got the wood frames from Michaels for $1 ea. The scrapbook paper was on sale for $.42 ea.


I haven't found pictures to put them in yet, or a place to hang them..

My first ever diaper cake

I made a diaper cake for my sister-in-law Marianne's baby shower for my nephew


A close-up before we wrapped it..


I didn't use a tutorial for this.. I just looked around on the internet, and kind of put my own together with the help of my mom.  We also made handmade bibs, burpcloths, washcloths, and a blanket.

Book Page Wreath

Found this awesome wreath at "Living with Lindsay"


You can find her tutorial here

and here is mine...


and here..


My pictures aren't as good as hers, but oh well..
Instead of using brown for the book pages, I used glitter glue.. although you can't tell it here.  My mom also made one, so I will post hers as soon as she gets it done


My first sewing project with my sewing machine.. a keychain!

I saw this keychain here and decided I had to try it..


now of course.. this is my first project, and I am not well adjusted to my machine yet.. so by the end of it, I had had enough, so the stitching around the ribbon sucks... but hey.. its made!


and the inside of it..


I also made my husband one, I will post those when I can get pictures...

Sunday, October 11, 2009

Baby picture frame

I made this as a gift for a friends baby shower.

Just setting up!

I have done some recent crafts I thought I would share with the blog world.. and will also be trying some new things. so stay tuned!